Tadalafil entfaltet seine Wirkung über eine selektive Hemmung der PDE5, wodurch die Konzentration von cGMP im glatten Muskelgewebe stabil bleibt. Diese biochemische Modulation resultiert in einer langanhaltenden Relaxation der Gefäßwände. Der Wirkstoff wird nach oraler Einnahme effizient resorbiert, mit einer Bioverfügbarkeit von rund 80 %. Seine Halbwertszeit von bis zu 36 Stunden ist innerhalb dieser Substanzklasse außergewöhnlich. Abgebaut wird er in der Leber, hauptsächlich durch CYP3A4, mit anschließender biliärer Exkretion. Typische unerwünschte Wirkungen entstehen durch eine verstärkte Vasodilatation, etwa Kopfschmerzen oder Flush. Pharmakologisch wird cialis generika vor allem durch die verlängerte Wirkungsdauer charakterisiert.
Farmtek.net
Allegro Electronic Timer Operating Instructions
This equipment has been tested and found to comply
CAUTION: Changes made or modifications not
with the limits for a Class A digital device, pursuant
expressly approved by the party responsible for FCC
to Part 15 of the FCC Rules. These limits are de-
compliance of this equipment could void the user’s
signed to provide reasonable protection against
harmful interference when the equipment is oper-
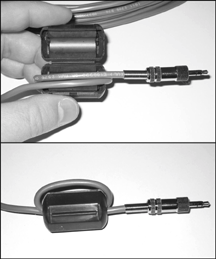
If a ferrite clamp is provided with any cabled pe-
ated in a non-residential installation. This equipment
ripheral, then the clamp must be installed as shown
generates, uses, and can radiate radio frequency
below in order to maintain FCC compliance of the
energy and, if not installed and used in accordance
with the instruction manual, may cause harmful in-terference to radio communications. However, there
This device has been designed to operate with an
is no guarantee that interference will not occur in a
antenna having a maximum gain of 3.0 dB. Use of
an antenna having a higher gain is strictly prohibited per regulations of Industry Canada. The required
If this equipment does cause harmful interference to
radio or television reception, the user is encouraged to try to correct the interference by one or more of
To reduce potential radio interference to other users,
the following measures: (1) Reorient or relocate the
the antenna type and its gain should be so chosen
receiving antenna. (2) Increase the separation be-
that the equivalent isotropically radiated power
tween the equipment and the receiver. (3) Consult
(EIRP) is not more than required for successful
the dealer or radio/TV technician for help.
Keep in mind that when the console is first turned
The 2005 Allegro timer is powered by four AA al-
on after being off for a while (e.g., overnight), the
kaline batteries instead of an AC adapter as in the
reported battery level is artificially high for the first
past. The timer runs 50 to 60 hours on a new set of
batteries. Always turn the timer off before changing
the batteries and always replace all four batteries at
When about 2 to 4 hours of console battery life are
the same time – do not mix old and new batteries.
remaining, the decimal point is flashed to alert the
To check the battery level, press the right arrow
timekeeper of the low battery. Note that the decimal
button on the timer console. The percent of battery
is also flashed when an electric eye in the arena has
remaining (“br”) is displayed. For example, if 45%
a low battery. Check the console’s battery level as
of the battery life is remaining, the display shows:
described previously to see if it is the reason the low
Turn the Polaris timer on and off using the slide
The normal time display is automatically restored in
switch located at the upper right corner of the timer
about eight seconds, or when the timer starts/stops,
Connections on the rear of the timer console have
The Display jack is for connection of an optional
changed with the introduction of the 2005 Allegro
arena display (scoreboard). Additional information
timer. The Power jack is gone and in its position is
the Input jack. The Input jack is for connection of
The Printer jack allows connection of the optional
optional input devices such as a bar code reader and
printer or computer interface cable. Additional in-
numeric keypad to be offered in the future. Do not
formation is provided with the printer and computer
plug an AC adapter from an older FarmTek
timer into the Input jack on the new Allegro. It can cause serious damage!
The electric eyes operate over 70 hours from a 9
volt alkaline battery (use only alkaline batteries).
The Power lamp on the unit glows steadily while
can cause problems: Do Not Remove the Antennas!
the battery is good and flashes when the battery is
Placement of the electric eyes and the timer console
in the arena and the announcer’s stand can affect
To help detect an eye with a low battery, the Al-
performance of the radio link. Note these guide-
legro timer in the announcer’s booth flashes the
decimal point on the time display when any electric
1) Ensure an unobstructed line-of-sight between
the antenna on the electric eye and the antenna
on the timer console in the announcer’s booth.
The electric eyes operate at least two hours after the
Verify clear line-of-sight from down at the an-
first indication of low battery. NOTE: The two hour
tenna’s level – not from your standing eye level.
period is from the first time the low battery light
2) Position the timer console at least 2-3 feet from
begins flashing. If a unit with a low battery is turned
major electronic equipment such as computers,
off and then later turned back on, the lamp may
glow steadily for some time before it starts flashing
again. This does not mean there are two more hours
When the electric eyes are setup with more than 100
Once the Power lamp begins flashing, it is simplest
feet between them, a late afternoon sun shining di-
to just replace the battery during the next break in
rectly into the Photo-Receiver (the electric eye with
your event – don’t worry about trying to use the last
the antenna) can reduce the working range between
the eyes. A simple remedy is to swap the electric
When storing the electric eyes for an extended pe-
eyes with each other so that the sun shines into the
riod of time, always remove the batteries.
face of the Photo-Transmitter instead (the electric
eye without the antenna). Or, you can construct a shade for the Photo-Receiver – see a sample sun-shield to print and cut out on the web at: http://farmtek.net/sunshield.htm.
Two Timers At Once Two complete timers can be used at the same time
make sure the one Photo-Transmitter that you turn
to provide back-up for each other. However, when
on is the older, wired Photo-Transmitter – both the
two Photo-Transmitters (the infrared light source)
wired and wireless Photo-Receivers will recognize
are on at the same time, they interfere with each
other at the Photo-Receiver. To prevent problems,
set up both complete timers, stacking the electric
If the two timers in use are both wireless timers,
eyes on top of each other. However, only turn on
then in addition to the requirements already men-
one of the Photo-Transmitters. Both Photo-
tioned, make sure the two Photo-Receivers (the
Receivers will “see” the beam, but since the beam is
electric eye with the antenna) operate on different
coming from just one Photo-Transmitter, there is no
channels. The channel number used by the Photo-
Receiver is stamped inside the battery compartment.
Note: Older wired electric eyes may not “recognize” the wireless Photo-Transmitter. In this situation,
Each wireless electric eye produced by FarmTek is
2) On the timer console, press the Eyes On button
permanently programmed with an electronic identi-
and hold the button down until a series of dashes
fication code. No two units have the same ID code.
( “-----”) is shown on the display (this will take
The ID code is transmitted along with other infor-
mation whenever the electric eye beam is broken or
3) Walk through the electric eye beam. When the
restored. For a set of wireless electric eyes to work
beam breaks, the electric eye sends a message to
with a particular timer console, the timer console
the timer console. The timer console displays a
must know the ID code of the electric eye being
four digit ID code for a few seconds, then the
normal display is restored. That’s it! The timer is
If you use a different set of electric eyes or a differ-
ent timer console than usual, you must have the
Note: If the dashes remain on the display, the timer
timer console “learn” the ID code of the electric
console did not receive a transmission from the
eyes being used. You may also want to perform this
electric eye. Make sure the eyes are on and visu-
procedure if your timer console and electric eyes no
ally aligned, then walk through the beam again.
If the timer still fails to receive an ID code, move
Follow these steps to force the timer console to learn
the eyes closer to each other and closer to the
the ID code of the electric eyes being used.
1) Set up the electric eyes and the timer console for
normal operation as per the Barrel Racing in- structions. (Note: The Check Eyes alignment indicator on the timer console will not update un- til after the ID code has been set.)
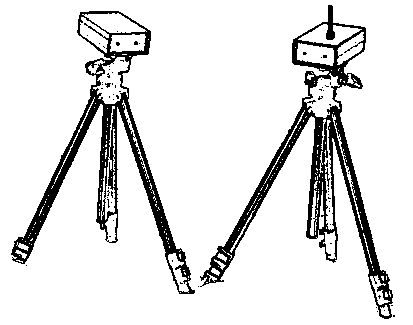
1) Attach each electric eye to a tripod. Place the eyes
sighting down the crack on the side of the electric
on opposite sides of the arena to form a start/stop
line between them. Extend tripod legs fully to en-
4) Turn on the timer console using the slide switch
sure the electric eyes are high enough to be bro-
located at the upper right corner of the timer.
5) When the timer is first turned on, the entire dis-
2) Turn the electric eyes ON. The power indicator
play is lit for about one second, then a time of
lamp on each unit should glow steadily. If the in-
"0.000" is displayed. If the timer fails to come on,
dicator is blinking, the battery is low and should
turn the power switch off and verify the batteries
3) Align the electric eyes. The electric eye on the
6) Walk through the electric eye beam at least once
opposite side of the arena should be directly in-
to force the eyes to send a message to the timer
line when sighting down either line on top of the
console. This makes the Allegro console update
electric eye (left to right alignment), and when
its electric eye alignment indicator (see below).
The Check Eyes indicator is shown on the time dis-
1) As the rider enters the arena and breaks the beam,
play when the electric eyes are not aligned or anytime
the timer automatically begins timing from zero.
2) When the rider finishes the run and again breaks
Important! When setting up the electric eyes, always
the beam, the timer stops and shows the rider's
take the time to align the eyes as outlined in Step 3
time. The timer is now ready for the next rider!
above– even if the timer indicates the eyes are
Note: After the beam is broken, it is ignored for
aligned. This ensures a strong alignment instead of a
about 2 seconds to allow dust to settle.
The Start/Stop button starts and stops the timer just
The Allegro saves times and penalties for the most
as if the electric eye beam had been broken.
recent 100 riders. Press the left arrow button to
scroll backwards through times and the right arrow
to move forward. Previous times are identified on
If the timer accidentally stops during the middle of a
the display by the presence of the Prev Time indica-
run, the rider can still be accurately timed. Pressing
the Restart button resumes timing as if the timer
had never been stopped. As long as the Restart but-
When viewing a previous time, its position relative
ton is pressed before the ride is completed, the time
to the current time is displayed as long as the arrow
is not lost. To alert you, the timer console beeps
button is held down. For example, “1” is shown
while the left arrow is pressed for the most recent
previous time. “2” is shown while the left arrow is
pressed for the second previous time, etc. Previous
Some events require the rider to pass through the
times are displayed for 8 seconds or until the timer
beam several times during a run. For these events,
starts, stops, or another button is pressed. After 8
the eyes can be disabled during the run, then re-
seconds, the original display is restored.
enabled before the rider finishes. To disable the
electric eyes, press the Eyes Off button. While the
eyes are disabled, the Eyes Off indicator is shown
Pressing the NO TIME button enters “no run” in the
on the display. Press the Eyes On button to re-
timer’s memory and prints “-- No Time --” on the
enable the electric eyes and remove the Eyes Off
optional printer. This ensures an entry is present in
timer memory and on the printer for each contestant
Penalties can be entered while the rider is on course
The preset time value for each penalty is 5 seconds.
or after a run is completed. Each press of the Penalty
To change the time value for a penalty, press and
button adds 1 penalty to the current run. The Penal-
hold down the Penalty button until the timer beeps
ties indicator displays the total number of penalties
and the current penalty value is displayed. Press the
recorded. Up to five penalties can be added to a run.
left arrow to lower the penalty value and the right
arrow to increase the penalty value. When the desired
While time is running, the time shown does not in-
penalty value is reached, press the Penalty button
clude the penalties. When time is stopped, the time
again. The new penalty time value is permanently
value of the penalties is added into the time shown.
saved until changed again in this same manner.
Trouble Shooting Suggestions • Verify both electric eyes are on and aligned. If the
• Ensure a clean “line of sight” between the timer
power light is flashing, replace the battery.
console and the electric eye with the antenna.
• Check the battery level (see page 1).
• Reset the electric eye ID Code in the timer console
• Move the timer console and the electric eye with
the antenna away from large metallic objects or po-
General terms and conditions Terms of Business and Conditions of use of Bayreuther Festspiele GmbH for the performances at Richard-Wagner-Festspiele 2014 1. Area of validity 1.1. These general terms and conditions regulate the legal relationships between Bayreuther Festspiele GmbH (hereafter: BF) and the ticket buyers and visitors to the performances at Richard-Wagner-Festspiele 2014
Langerhans cell histiocytosis: update for the pediatricianSheila Wand R. Maarten aDivision of Pediatric Hematology/Oncology,The Hospital for Sick Children, Toronto and UniversityLangerhans cell histiocytosis is the commonest of the histiocytic disorders. Owing toof Toronto, Toronto, Canada and bImmunology,Hematology/Oncology and Bone Marrow Transplant,the relative rarity of the condition, it
 This equipment has been tested and found to comply
CAUTION: Changes made or modifications not
with the limits for a Class A digital device, pursuant
expressly approved by the party responsible for FCC
to Part 15 of the FCC Rules. These limits are de-
compliance of this equipment could void the user’s
signed to provide reasonable protection against
harmful interference when the equipment is oper-
If a ferrite clamp is provided with any cabled pe-
ated in a non-residential installation. This equipment
ripheral, then the clamp must be installed as shown
generates, uses, and can radiate radio frequency
below in order to maintain FCC compliance of the
energy and, if not installed and used in accordance
with the instruction manual, may cause harmful in-terference to radio communications. However, there
This device has been designed to operate with an
is no guarantee that interference will not occur in a
antenna having a maximum gain of 3.0 dB. Use of
an antenna having a higher gain is strictly prohibited per regulations of Industry Canada. The required
If this equipment does cause harmful interference to
radio or television reception, the user is encouraged to try to correct the interference by one or more of
To reduce potential radio interference to other users,
the following measures: (1) Reorient or relocate the
the antenna type and its gain should be so chosen
receiving antenna. (2) Increase the separation be-
that the equivalent isotropically radiated power
tween the equipment and the receiver. (3) Consult
(EIRP) is not more than required for successful
the dealer or radio/TV technician for help.
Keep in mind that when the console is first turned
The 2005 Allegro timer is powered by four AA al-
on after being off for a while (e.g., overnight), the
kaline batteries instead of an AC adapter as in the
reported battery level is artificially high for the first
past. The timer runs 50 to 60 hours on a new set of
batteries. Always turn the timer off before changing
the batteries and always replace all four batteries at
When about 2 to 4 hours of console battery life are
the same time – do not mix old and new batteries.
remaining, the decimal point is flashed to alert the
To check the battery level, press the right arrow
timekeeper of the low battery. Note that the decimal
button on the timer console. The percent of battery
is also flashed when an electric eye in the arena has
remaining (“br”) is displayed. For example, if 45%
a low battery. Check the console’s battery level as
of the battery life is remaining, the display shows:
described previously to see if it is the reason the low
Turn the Polaris timer on and off using the slide
The normal time display is automatically restored in
switch located at the upper right corner of the timer
about eight seconds, or when the timer starts/stops,
Connections on the rear of the timer console have
The Display jack is for connection of an optional
changed with the introduction of the 2005 Allegro
arena display (scoreboard). Additional information
timer. The Power jack is gone and in its position is
the Input jack. The Input jack is for connection of
The Printer jack allows connection of the optional
optional input devices such as a bar code reader and
printer or computer interface cable. Additional in-
numeric keypad to be offered in the future. Do not
formation is provided with the printer and computer
plug an AC adapter from an older FarmTek
timer into the Input jack on the new Allegro. It can cause serious damage!
This equipment has been tested and found to comply
CAUTION: Changes made or modifications not
with the limits for a Class A digital device, pursuant
expressly approved by the party responsible for FCC
to Part 15 of the FCC Rules. These limits are de-
compliance of this equipment could void the user’s
signed to provide reasonable protection against
harmful interference when the equipment is oper-
If a ferrite clamp is provided with any cabled pe-
ated in a non-residential installation. This equipment
ripheral, then the clamp must be installed as shown
generates, uses, and can radiate radio frequency
below in order to maintain FCC compliance of the
energy and, if not installed and used in accordance
with the instruction manual, may cause harmful in-terference to radio communications. However, there
This device has been designed to operate with an
is no guarantee that interference will not occur in a
antenna having a maximum gain of 3.0 dB. Use of
an antenna having a higher gain is strictly prohibited per regulations of Industry Canada. The required
If this equipment does cause harmful interference to
radio or television reception, the user is encouraged to try to correct the interference by one or more of
To reduce potential radio interference to other users,
the following measures: (1) Reorient or relocate the
the antenna type and its gain should be so chosen
receiving antenna. (2) Increase the separation be-
that the equivalent isotropically radiated power
tween the equipment and the receiver. (3) Consult
(EIRP) is not more than required for successful
the dealer or radio/TV technician for help.
Keep in mind that when the console is first turned
The 2005 Allegro timer is powered by four AA al-
on after being off for a while (e.g., overnight), the
kaline batteries instead of an AC adapter as in the
reported battery level is artificially high for the first
past. The timer runs 50 to 60 hours on a new set of
batteries. Always turn the timer off before changing
the batteries and always replace all four batteries at
When about 2 to 4 hours of console battery life are
the same time – do not mix old and new batteries.
remaining, the decimal point is flashed to alert the
To check the battery level, press the right arrow
timekeeper of the low battery. Note that the decimal
button on the timer console. The percent of battery
is also flashed when an electric eye in the arena has
remaining (“br”) is displayed. For example, if 45%
a low battery. Check the console’s battery level as
of the battery life is remaining, the display shows:
described previously to see if it is the reason the low
Turn the Polaris timer on and off using the slide
The normal time display is automatically restored in
switch located at the upper right corner of the timer
about eight seconds, or when the timer starts/stops,
Connections on the rear of the timer console have
The Display jack is for connection of an optional
changed with the introduction of the 2005 Allegro
arena display (scoreboard). Additional information
timer. The Power jack is gone and in its position is
the Input jack. The Input jack is for connection of
The Printer jack allows connection of the optional
optional input devices such as a bar code reader and
printer or computer interface cable. Additional in-
numeric keypad to be offered in the future. Do not
formation is provided with the printer and computer
plug an AC adapter from an older FarmTek
timer into the Input jack on the new Allegro. It can cause serious damage!
 The electric eyes operate over 70 hours from a 9
volt alkaline battery (use only alkaline batteries).
The Power lamp on the unit glows steadily while
The electric eyes operate over 70 hours from a 9
volt alkaline battery (use only alkaline batteries).
The Power lamp on the unit glows steadily while